Pages

Wednesday, June 30, 2010

Sugar Snap Pea Soup with Basil, topped with Ham, Onion & Pepper Saute

So, I know it's summer, but June Gloom seems never ending and I've been meaning to post this soup recipe for forever, and its simply yummy, so here it is - adapted from Dr. G's recipe on page 214 of Dr. Gundry's Diet Evolution.

Serves 4
4 Cups sugar snap peas
1/2 Cup frozen, shelled edamame
4 Cups vegetable broth
1 handful fresh basil, roughly chopped
Salt and pepper to taste
1 Tbsp extra virgin olive oil
8 oz. deli ham or turkey bacon, chopped
1/2 onion, chopped
1 red bell pepper, chopped
2 cloves garlic, pressed

DIRECTIONS
Put the peas, edamame and broth in a large saucepan and bring to a boil over medium-high heat. Reduce the heat and simmer until vegetables are soft, approximately 10 minutes. Meanwhile, prepare the Saute for topping the soup.

Heat the olive oil in a skillet over medium-high heat. Add the onions, bell pepper and ham and cook, stirring until everything is browned and onions are tender. Add the garlic and cook another 1 - 2 minutes, stirring constantly so it doesn't burn. Take the mixture off the heat and cover to keep warm while you finish the soup.

Once the vegetables are tender, transfer the contents of the pot to a blender using a ladle. Add the basil and about 1 teaspoon each salt and pepper. Blend ingredients until smooth. Add additional salt and pepper to taste (I always err on the side of under-seasoned and then add more if needed to my personal bowl and let Max do the same.) Pour directly into bowls, top with the Saute and serve.

Sunday, June 27, 2010

Dr. G's "Rice & Beans"

You know you've been on Gundry for a while when cauliflower sounds like a stick-to-your-ribs kind of food. Cauliflower has become somewhat of a comfort food for me.  When I first read Dr. G.'s recipe for "Rice & Beans", I thought it sounded a little strange. But, when I read it recently, I thought, "sounds delish!" And delish it is!  This is absolutely a stick-to-your ribs meal that won't be mistaken for the real thing, but is no less satisfying and comforting.

Here's the recipe from page 232 of DGDE:
1 head cauliflower
1/4 cup extra virgin olive oil
4 chicken or turkey Polish sausages or kielbasa, cut into 1-inch pieces
1 large yellow onion, chopped
1 green bell pepper, seeded and chopped
2 celery stalks, chopped
4 garlic cloves, minced or chopped
2 tablespoons Cajun seasoning, such as Emeril's
1/4 teaspoon cayenne pepper
2 teaspoons dried oregano 
1 tablespoon dried thyme
1 tablespoon soy flour
1 (16-ounce) bag frozen shelled edamame (green soy beans)
Sea salt and cracked black peppercorns to taste 
Tabasco or other hot sauce

Cut the cauliflower into pieces and pass through the shredder blade of a food processor or a cheese shredder to form rice-size pieces.  Set aside.  Heat the oil in a large nonstick skillet over medium-high heat; add the sausage, onion, bell pepper, celery, garlic, Cajun seasoning, cayenne pepper, oregano and thyme.  Cook, stirring often, until the vegetables have softened and are starting to brown.  Stir in the soy flour.  Add the edamame, and cook for 5 more minutes, or until they are fully warmed.  Add the cauliflower "rice" and cook, stirring, for 2 minutes to warm through.  Add salt and pepper to taste. Turn off the heat and scoop 1 cup of the mixture into a food processor and pulse until creamy.  Return this paste to the skillet and stir.  Add a little hot water to adjust the consistency; the dish should be quite thick.  Serve in bowls.  Add Tabasco or other hot sauce.
Phase 2: Replace sausages with 4 Boca Burgers or Boca sausages, added along with the edamame.  Serve over sauteed spinach.
Phase 3: Reduce the amount of edamame and Boca "meat" by half, and add 1 (5-ounce) bag of prewashed spinach or 1 (10-ounce) box frozen spinach, thawed. Serve over raw spinach or romaine lettuce. 

I ran the cauliflower through a food processor.  My "rice" was a combination of pellets and shreds.

I sauteed the sausage, onion, bell pepper, garlic and spices as recommended, but left out the celery - not a fan.  I used two andouille sausages.  You can see my wine and copy of DGDE in the background - my two cooking essentials!
Here's the sauteed mixture with the edamame.  It probably took a little longer than 5 minutes to fully warm all the soybeans.  I used almond flour instead of soy flour - I don't have it on hand.  
Here's my FULL skillet with the sauteed mixture, edamame and rice.  I think I need to put a new, larger skillet on the wedding registry!
My doggie Lou would disagree.  He thinks my skillet is the perfect size for ensuring spill over.  Here he is licking up my mess!
I had to add a little water to make the paste.  I picked out the sausage for this step - pulverized meat just doesn't sound appetizing to me!  
It all came together beautifully and the tabasco was a yummy, spicy addition.
Coming up... a Phase 2 version of this meal with veggie "meat".   I think I also see Jambalaya with cauliflower "rice" in our future.  

Wednesday, June 23, 2010

Snack Time - Jazzied Green Beans

Yes, jazzied is a word... it means to add a little pizzazz to something otherwise a smidge mundane. In this case, the addition of red onion and lemon zest pizzazz to some steamed green beans. As I've mentioned, I like to keep veggies around in the fridge in case I need a little something more than my nut snack in between meals. This week, I decided to jazzy up some green beans. I took two bags of the Trader Joe's haricot verts (I just prefer the smaller, French, green beans but you can use any kind) and cooked one bag at a time in the microwave for 1.5 minutes (don't forget to snip the corner). The bag suggests cooking for 3 - 4 minutes, but I like a crisp green bean. After cooling for a bit, I cut open the bags and rolled the green beans out of the bag (they stay nice and lined up for quick cutting).
I cut the green beans in thirds and put the pieces in a large tupperware. Then I mixed them with finely diced red onion, a generous drizzle of extra-virgin olive oil, a squeeze of lemon juice and salt and pepper. Keep the tupperware in the fridge and spoon some out for a snack or a lunch side dish. For an even jazzier veggie snack with a little punch of protein, sprinkle chopped pecans, slivered almonds or feta on top.

Sunday, June 20, 2010

I Scream, You Scream, We All Scream for Ice Cream

I love ice cream! I love frozen yogurt! I miss them both. Perusing through this month's Sunset magazine with pictures of ice cream sandwhiches from CoolHaus my standard low-level hankering for the sweet stuff went through the roof. I mean, c'mon - how delicious do these look!?!?!?
So, I decided to give Dr. Gundry's Protein-Powered Mint Chocolate Chip Ice Dream a try. To my delight, it was a delicious, creamy, sweet treat! My blender is a smidge tired and old, so it did not power through the ice like I hoped. I had to add about 1/4 cup of soymilk just to get my "ice cream" to blend, so the final product was a little softer than intended, but it still hit the spot. I imagine an ice cream maker would have turned my blended concoction into a treat narrowly distinguishable from the real deal.

I should note that Dr. Gundry teaches us to retreat from sweet (DGDE, page 85). Even no-calorie artificial sweeteners that taste sweet trigger an insulin response and send the message to our genes to store fat (DGDE, page 33). So, this treat should be reserved for those times when you have a serious hankering.

Here is Dr. G's Recipe from page 263 of Dr. Gundry's Diet Evolution (DGDE):
1 unripe banana, peeled and unfrozen (see Note)
1 Tbsp unsalted tahini
1 Tbsp non-Dutch-processed cocoa powder
1 scoop chocolate protein powder
3 fresh mint leave or 4 drops extract
2 packets stevia
3 Cups ice cubes (approx.)
Unsweetened soymilk
1 Tbsp cocoa nibs

Place the banana, tahini, cocoa powder, protein powder, mint, sweetener and 1 cup of ice cubes in a blender. Use ice-crushing mode or slow speed to pulse until the ice begins to fragment and then gradually increase speed, adding more ice cubes to make a very thick consistency. Add a bit of soymilk, a tablespoon at a time if it's too thick to mix well. Blend at high speed until the mixture reaches a creamy consistency. Add the cocoa nibs and blend briefly to distribute but do not grind.

Note: Buy bananas green, peel them, and freeze them in resealable plastic bags so you can use them one at a time.

Friday, June 18, 2010

This Must Be Cheating! Pan-Fried Tilapia

Last night I made a variation of Commander Gundry's Pecan Fish (page 254 of Dr. Gundry's Diet Evolution). It was so delicious that it felt like cheating. I won't crave fish and chips now that I know I can make this yummy fried fish "breaded" with almond meal.

Four Servings

INGREDIENTS
4 tilapia fillets
1 Cup almond meal
1 Tbsp Cajun seasoning, plus more for dusting
1 tsp each salt and pepper
1 egg
1 Cup unsweetened soymilk
2 - 3 Tbsp extra virgin olive oil
1 lemon
Sprinkle of fresh sage

DIRECTIONS
In a shallow bowl or baking dish, whisk together egg and milk. On a plate or in a shallow baking dish, combine almond meal, 1 tablespoon Cajun seasoning, salt and pepper. Set out fillets and sprinkle generously on both sides with more Cajun seasoning.
Set up an "assembly line" with the seasoned fish fillets, egg wash, almond meal mixture and an empty plate. One by one, dip a fillet in the egg wash coating both sides then dredge in the almond meal, doing your best to get an even coating and then place on the clean plate.
Once all your fillets are "breaded", generously coat a skillet with olive oil (approximately 2 - 3 tablespoons) and heat on medium high. Cook 2 to 3 minutes per side until the outside is golden and the interior is opaque. Sprinkle fillets with fresh thyme and serve with a wedge of lemon. I served the fish with mashed cauliflower, blended with about 2 cups of coarsely chopped fresh spinach... gotta get your greens in!

Wednesday, June 16, 2010

Greek Frittata

My man had a big hearing this morning, so although I joked with my yoga instructor that I wouldn't even be able to lift my arms after our 7 a.m. class, I hussled home and made him a delicious Greek-inspired frittata.

INGREDIENTS
8 - 10 eggs (I used 1/2 of a 16oz. carton of egg substitute and 3 whole eggs)
2 - 3 Tbsp unsweetened soy milk
1/4 Cup red onion, chopped
2 Cups spinach, coarsely chopped
2 Tbsp kalamata olives, pitted, coarsley chopped*
2 Tbsp pepperoncinis, seeds removed, chopped*
2 Tbsp Greek feta, crumbled
1 - 2 Tbsp Extra virgin olive oil
Salt and Pepper
*Buy already pitted olives and already sliced pepperoncinis to save yourself time.
DIRECTIONS
Place eggs and/or egg substitute in a medium bowl, sprinkle generously with salt and pepper, add soy milk and then whisk with a fork until blended. Set aside. Set broiler to high. Heat olive oil in a 12", oven-proof skillet* over medium-high heat. Add onions, cook, stirring occasionally until translucent, about 3 minutes. Add spinach, pepperoncinis and olives and saute until spinach is wilted. Spread veggies evenly over skillet and pour egg mixture on top. If needed, tilt the skillet from side to side to evenly distribute the eggs. Cook until bottom is set, approximately 4 minutes. A thin layer of runny egg with remain on top. Sprinkle feta evenly over the frittata.
Put the skillet in the broiler and cook until golden, approximately 5 minutes more. Remove the frittatta from the broiler and allow to cool for a couple of minutes. Use a plastic or wooden spatula to cut the frittata into quarters or eight slices.
* If you don't have an oven-proof skillet (I don't) cover the plastic handle with tin foil.

Why Frittata? My favorite way to prepare eggs is in a frittata. First of all, it just sounds fancy... "would you like to join me for a champagne brunch? I'm making a frittata." Second of all, its terribly easy - saute delicious veggies or other yummies, pour eggs over the top, cook on the stove for a bit and then throw it in the broiler for a few minutes - no potential omelet flipping disaster involved. Thirdly, frittatas are totally transportable - eat it on the go like a piece of pizza (ahh, pizza, how I miss you!) And lastly, it keeps well in the fridge. I make frittatas in my 12" skillet, cut it into fourths and I have breakfast for myself and Max for two days.

Tuesday, June 15, 2010

What a Loser!

The Biggest Loser! Congrats to our friend P.W. who beat out Max in their race to lose. The deadline was today and P.W. beat Max by one pound. We owe him a bottle of wine - red, of course.

Saturday, June 12, 2010

Embrace the BBQ

Correct me if I'm wrong, but I think your average woman is intimidated by the bbq. Well Ladies - put on your big girl pants - it's time to embrace the bbq. I will admit, it took me several years to muster the courage to brave the grill on my own. But now, I'm a convert. Grill cooking is easy, saves me clean-up time and effort and makes food taste ahhhmazing. Especially if you own a gas grill, bbq'ing is the perfect answer to a quick weeknight dinner. It took me about 15 minutes to prepare this meal.
I cut zucchini in 1/2, chopped bell peppers into quarters and tossed them in extra-virgin olive oil, salt and pepper. I threw the vegetables on a heated grill along with pre-cooked turkey sausages and cooked until the vegetables were browned and tender. For extra flavor, drizzle the cooked vegetables with more olive oil, vinegar or your favorite vinaigrette.
Chop up leftover grilled vegetables and toss in a scramble the next morning. Yummy!

Thursday, June 10, 2010

How to Chop a Bell Pepper

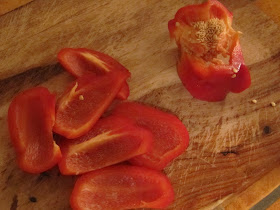
Bell pepper seeds are a total nuisance! They get everywhere. Use this method to chop your bell peppers and you'll never have to gather and toss the seeds again. Set you washed bell pepper stem side up on you cutting board. Slice lengthwise down the pepper, inserting your knife 1/2" or so from the stem, rotating and slicing until you've cut off all sides of the pepper.
Discard the core. Julienne the slices and then line up and cut crosswise for a fine chop.

Wednesday, June 9, 2010

Cobb Salad

I L-O-V-E Cobb Salad. But in it's traditional form, the "salad" is basically a bunch of protein masquerading as a healthy lunch option. Rest assured fellow Cobb lovers, it is possible to highlight the flavors of a cobb salad and enjoy a much lighter, Gundry-friendly version. Since there are so many protein components (chicken, bacon, egg, cheese and often avocado) in a Cobb, you have to make sure that you use small amounts of each, so the flavors are present, but not overdone. Also, instead of a creamy blue cheese dressing, use a vinaigrette - it will actually allow the flavors to stand out more than they would if the meal were drenched in a creamy, blue cheese dressing. (Notice how only small amounts of each protein area used.)
Serves 1

1 egg, hardboiled, chopped
1 slice turkey bacon, cooked until crisp, chopped
1/4 Cup chicken*
1 Tbsp blue cheese, crumbled
3" segment of cucumber, sliced in half, seeds removed, chopped
1 small head of romaine sliced thinly or 1/2 bag of pre-washed and chopped leaves

Place all ingredients in a mixing bowl. Top with balsamic dijon salad dressing and stir to combine.

*I used canned chicken packed in water for ease and cost, but grilled chicken works just as well (better, actually).


The Nut Snack

Dr. Gundry calls the twice-a-day nut snack a "nutty gift" because 1/4 cup of nuts helps stave off hunger and also ensures that your brain has sufficient protein and glucose to burn for energy without going after your muscles. I keep a large jar full of mixed nuts on the counter with my 1/4 cup measure. When the jar runs out, I try a new mixture.
Pictured here is a mixture of: pecans, peanuts, brazil nuts (those huge ones) and almonds. The jar of peanuts only in the background is for my fiance Max who is a one nut kind of a man (okay, I'm laughing out loud too, but you know what I mean). Whenever I leave the house, I have a small tupperware container of nuts in my purse. If you've been living the Gundry lifestyle successfully for six weeks or more, try cutting back to 1/8 Cup.

Dr. G. recommends raw, unsalted nuts, with the exception of peanuts which you should buy roasted, but unsalted. Raw is best because nuts contain beneficial omega-3 fats whose antioxidant benefits are lost in the cooking process. Unsalted is best because salt tells your body that you want more. See page 78 of Dr. Gundry's Diet Evolution for the full explanation. Also, avoid sunflower seeds which have omega-6 fat (the "bad" fat) and cashews which are high in sugar. You can have 1 Tbsp of nut butter (peanut isn't the only kind out there) instead of your nut snack, but make sure that the brand you select does not add oil or sugar. Dr. G. warns that unlike nuts, nut butters are fully digestible, so you will be consuming more calories than you would with just raw nuts.

Tuesday, June 8, 2010

Who Needs The Bagel & Cream Cheese Smoked Salmon Salad

Who am I kidding? A bagel would be delicious - but so is your slim, new, Gundry-eating tummy. Forgo the bagel and enjoy some of the flavors with this delicious salad.
Serves 2
INGREDIENTS
1 large head romaine lettuce, thinly sliced (or 1 bag of pre-washed romaine)
4 oz. smoked salmon, chopped or torn into large pieces
1/2 Cup sliced cucumber
1/4 Cup thinly sliced red onion
2 Tbsp small capers
Vinaigrette (recipe follows)
Salt & Pepper to taste

DIRECTIONS
Put romaine, salmon, cucumber and red onion in a bowl and top with vinaigrette. Mix to combine. Divide onto two plates and top with capers.

Vinaigrette
Combine 1 Cup extra virgin olive oil, 4 Tbsp each red wine vinegar and balsamic vinegar, 2 Tbsp water, 1 tsp each garlic powder, salt and pepper in a jar and shake to mix. Use some for your salad and save the rest for later in the week.

Perfectly Thin... Sliced Vegetables

Working on being perfectly thin yourself? Perfectly, thinly sliced vegetables on your salads will help you get there. I love, love, love my kyocera mandoline that I received as a gift from my lovely (soon-to-be) mother-in-law. The easy to use handheld madoline has an adjustable ceramic blade with four different settings from super-duper thin to thin (super thin and thin plus naturally being the two degrees of thin in between). I love red onion on salads, but the bite can be overpowering unless you have super thin slices - enter the mandoline.

Monday, June 7, 2010

Entertaining Gundry Style

After 21 years educating southern California's youth, my mom is heading into retirement. Her school always hosts a huge, fun-filled dinner with a tribute show. This year's show was Abba-themed and my mom's tribute song was Recycling Queen - I'm so proud! Anyway, I thought it would be special to start off the evening by gathering her closest friends and family for a toast. As you may have read, my parents as well as my aunt and uncle are also on Gundry. So, I was in a bit of a quandary trying to figure out how to host a gathering that would satisfy non-Gundry'ers, but provide Gundry-friendly foods for those that wanted to stay on track. Well, my mind of course went first to CHEESE - a crowd-pleaser that in moderation is well within the bounds of a Gundry lifestyle. I chose three harder cheeses that could easily be sliced and eaten without bread or crackers and a softer goat cheese. I picked up some yummy antipasto from Whole Foods - roasted garlic, marinated bell peppers, feta stuffed peppers and some adorable flower-shaped red peppers I'd never seen before. I served store-bought tapenade and a homemade Gundry-friendly artichoke dip (recipe follows) with endive, radicchio and red bell peppers for dipping. With the delicious spread, I served my new, favorite red wine, Rosso. For the non-Gundry'ers I also had crackers available, but was pleasantly surprised to see that everyone gobbled up the vegetable dippers.
Artichoke Dip
1/2 lb. cottage cheese
2 Tbsp plain yogurt
1 can artichoke hearts, drained
1/3 Cup parmesan cheese, grated
2 tsp. fresh lemon juice
2 cloves garlic
1/2 tsp each salt & pepper
Small handful of flat-leaf parsley, washed, stems removed

Combine all ingredients in a food processor and whirl until smooth. Serve with endive, radicchio and red bell pepper or your choice of vegetable dippers.

Saturday, June 5, 2010

Tofu Surprise

Even before starting on Gundry my fiance and I would eat tofu fairly often. We affectionately began to refer to tofu stir-fry as Tofu Surprise because it was always a surprise to see what vegetables or combination of vegetables I would include in the meal. Tofu Surprise remains a go-to meal for us. Unfortunately, most pre-made Asian sauces are made with sugar. Teriyaki - so tasty, but so sugary! So, I had to get a little creative. I hope you enjoy the results.

Serves 3 - 4

INGREDIENTS
4 Tbsp soy sauce
2 Tbsp sesame oil
2 Tbsp extra virgin olive oil
1 Tbsp red wine or apple cider vinegar
1 Tbsp grated, fresh ginger
2 garlic cloves, pressed
1/4 tsp Stevia*
1 package firm tofu
1.5 - 2 lbs vegetable(s) of your choice, roughly chopped
(I used broccoli, sugar snap peas, red onion & bell pepper)
DIRECTIONS
In a medium bowl combine all ingredients except tofu and vegetables and whisk to make the sauce. Set in the refrigerator to allow the flavors to meld while you prepare the rest of the meal. Perfectly Pan-Fry the Tofu (click the link for the recipe). In the same skillet, add the chopped vegetables and reduce the heat to medium-low. Mix the vegetables coating with the oil and seasonings remaining in the skillet.
Add the sauce, turning to coat the vegetables. Cover the skillet and continue to cook until vegetables are tender, approximately 10 minutes. Remove the pan from the heat. Cut the tofu into bite-size pieces (if you have not done so already) and add to the vegetables. Serve the stir-fry in bowls. If any sauce remains in the skillet, spoon it over the stir-fry before serving.

This dish is delicious the next day!

*Stevia extract is a natural sweetener. It can be found in bulk or in small packets at Trader Joe's and most grocery stores.

Friday, June 4, 2010

Perfectly Pan-Fried Tofu

I love using tofu as a hearty, plant-based, protein alternative to meat. It took me a while to figure out how to prepare it, but I'm consistently happy with the results using the method below.

Cut the block of tofu into 6 or 8 slices approximately 1/4-inch thick. Lay the slices on one end of a dish towel and use the other end to blot the top of the tofu. Move the slices of tofu to a dry section of the towel and repeat this step. Lay the dry slices of tofu on a plate and sprinkle the top generously with salt, pepper and garlic powder.
Cover the bottom of a large skillet with extra virgin olive oil (1 to 2 Tbsp) and heat on medium-high. When the oil is hot, place the tofu slices in the skillet, seasoned (top) side town. Sprinkle the other side with salt, pepper and garlic powder as you did on the top side.
Pan fry the slices until golden brown, flip and cook the other side, approximately 6 minutes per side. Check the cooking progress from time to time and move the slices around if necessary to ensure even cooking and avoid burning. Remove the slices from the pan and place on a plate lined with a paper towel to remove excess oil.
You can serve the slices, as is, alongside a salad or other vegetable side dish as if it were a piece of chicken or other meat. Yum! If using in a stir-fry, allow to cool several minutes and then cut the slices into bite-size pieces.

Thursday, June 3, 2010

A Rosso By Any Other Name...

My dear friend and fellow blogger November Grey recently introduced me to my favorite everyday red wine - Rosso. Fracis Ford Coppola's new, red, table wine is anything but. The blend of Zinfandel, Syrah and Cabernet Sauvignon has the richness and depth of other more expensive blends, but is only about $8 a bottle - a total steal.

Tuesday, June 1, 2010

Onions - No Laughing Matter!

Store your onions in the fridge or throw one in the freezer a few minutes before cutting. I find a cold onion doesn't make me cry as much.

Baked Indian Chicken

I pulled this recipe from the February 2010 Issue of Bon Appetit. It is a Gundry-friendly recipe requiring no tweaks. The original recipe calls for a roasting chicken, cut into eight pieces, but I just use boneless, skinless chicken breasts or tenders.

Four Servings

INGREDIENTS
1 cup plain yogurt
1 handful cilantro, washed, dried and coarsely chopped
3 Tbsp extra-virgin olive oil
1 Tbsp garam masala*
2 tsp kosher salt
2 garlic cloves, minced or pressed
1 lb boneless skinless chicken breasts or tenders
2 small or 1 large onion, cut into 1/4"-thick slices

DIRECTIONS
Mix first six ingredients in a shallow baking dish. Place chicken pieces in the baking dish, turning to coat on all sides. Use a spoon to redistribute any unused marinade and spread over chicken if necessary. Cover with saran wrap and marinate in the fridge for at least 2 hours.*
In a separate baking dish, spread out the slivered onions.* Place the baking dish in the oven and preheat the oven to 400, allowing the onions to get a slight head start on the chicken. When the oven is heated, remove the baking dish from the oven and place the pieces of chicken on the bed of onions. If marinade remains in the bottom of the marinating dish you can use a spoon to scoop it up and spread it on top of the chicken pieces.
Continue roasting the onions with the chicken for 30 minutes to an hour depending on what cut of chicken you used (tenders will cook more quickly than thick breasts). Serve the chicken atop a helping of the onions - the roasting has made them tender, sweet and delicious.

*An Indian spice mixture that you can find in most grocery stores with a decent selection of spices.
* This is a great recipe to begin in the morning before work. Prepare the marinade, add the chicken and let it hang out in the fridge while you're gone. When you get home from work, just place the marinated chicken on the cut onions and roast.
* The original recipe has you arrange the onions on a large, rimmed baking sheet. The onions brown nicely with a baking sheet, but I find the baking dish to be more manageable. It's up to you.